
Stucco Installation — Complete Guide
Planning a full stucco installation means more than picking a color and hoping the crew shows up. This guide walks you through the entire process for new construction, additions, and exterior walls in Scottsdale, from base coats and lath to the stucco textures that give your home its final look. You will learn what a proper install involves, what actually drives the price, and how to compare three coat systems, one coat systems, and synthetic EIFS. Most importantly, you will know the right questions to ask before you sign anything, so surprise costs and vanishing contractors never enter the picture.
What You'll Find in This Guide
- Stucco Crack Repair Timeline: How Long Small vs. Large Damage Takes to Fix
- How Much Does Stucco Installation Cost?
- Why Stucco Cracks in Scottsdale: 8 Causes Behind Damaged Walls
- Stucco Repair vs. Painting: When to Fix Cracks Before You Refresh
- Stucco Installation Terms Explained: A Plain-English Glossary
- Stucco Installation in Scottsdale, AZ
- Can You Patch Over an Old Stucco Repair? Blending Rapid Set Stucco Patch Right
- Cost to Repair a Stucco Hole in Scottsdale: Pricing by Size and Depth
Prefer to have a pro handle it? Stucco Installation is one call away.
The Stucco Installation Process: Three Coat, One Coat, and EIFS
Stucco remains one of the most popular exterior finishes in the Southwest for good reason. According to National Association of Home Builders data, stucco covered 48% of new single-family homes started in the Mountain division in 2024, the region that includes Arizona. It handles heat well, resists fire, and lasts decades when someone installs it correctly. That last part is where projects succeed or fail.
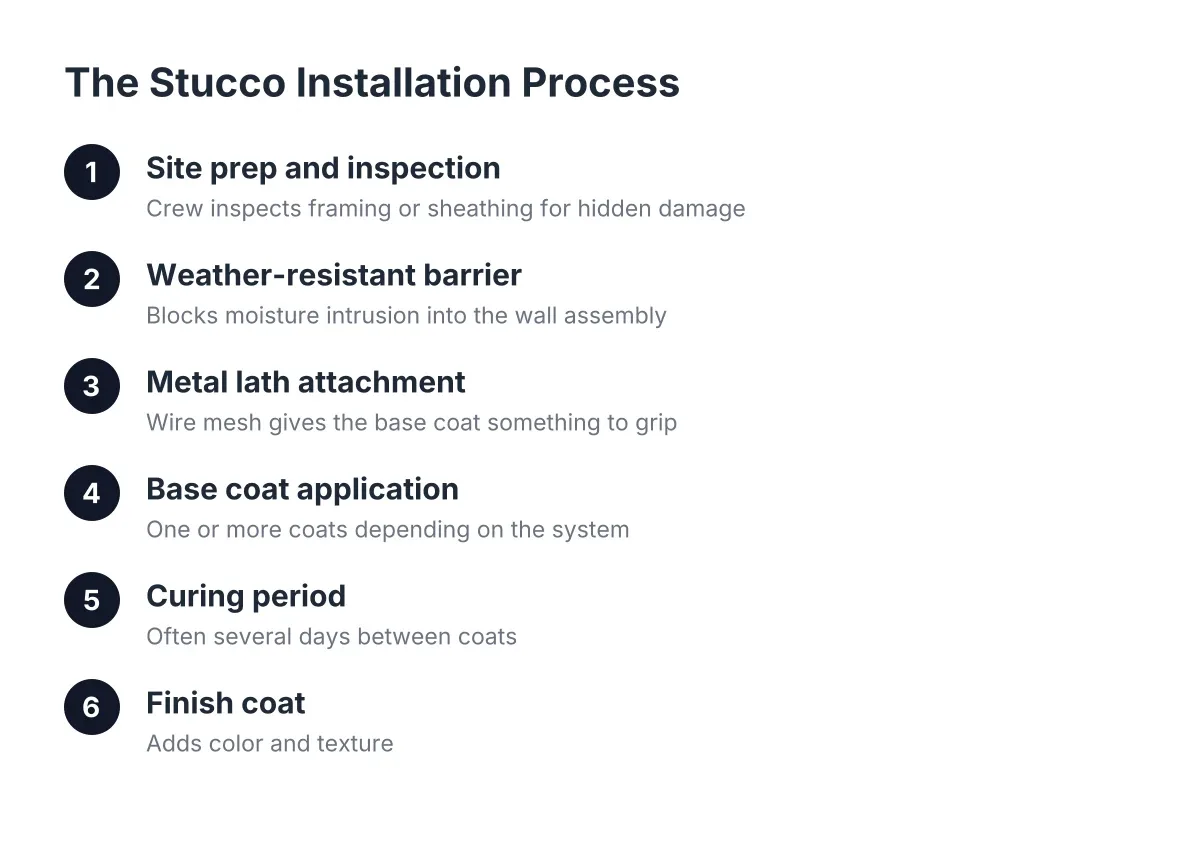
A traditional three coat system starts with a weather barrier and metal lath fastened to the wall. Next comes the scratch coat, a base layer scored so the following coat can grip it. The brown coat follows, building thickness and creating a flat, even plane. Finally, the finish coat delivers the color and texture you actually see. Each layer needs proper curing time, which is why a quality three coat install takes longer than a one coat job. If any of those terms feel unfamiliar, the plain-English stucco installation glossary covers all of them, so you can read a quote without guessing.
One coat stucco compresses the base layers into a single application over foam board, which speeds things up and can lower labor costs. However, it produces a thinner wall assembly, and thinner walls forgive less. In Scottsdale's temperature swings, that matters. Synthetic stucco, known as EIFS, is a different animal entirely. It layers foam insulation, a base coat with mesh, and an acrylic finish. EIFS insulates well, but it demands flawless moisture detailing because water trapped behind it has nowhere to go.
How Long a Full Install Takes
For an average Scottsdale home, expect a three coat install to run one to three weeks depending on wall area, weather, and cure times between coats. One coat systems move faster, often finishing in under a week. That said, rushing cure times is one of the install mistakes that leads to cracking later, a pattern covered in detail in why stucco cracks in Scottsdale. A contractor who promises a full three coat system in three days is either cutting cure time or cutting coats. Either way, you inherit the problem.
What Drives Stucco Installation Cost, and How to Avoid Surprise Bills
Every homeowner asks the same first question: what will this cost? The honest answer depends on your walls, not a national average. Still, you can understand the drivers before anyone measures anything. The full breakdown lives in the guide on how much stucco installation costs, but here is the high-level picture.
Square footage sets the baseline. More wall means more material and more labor, and two story walls cost more per square foot than single story walls because of scaffolding and access. Beyond that, the condition of the substrate matters enormously. New construction with clean sheathing is the simplest scenario. In contrast, an addition that has to tie into existing stucco, or a wall with old material that needs removal first, adds prep hours that show up on your invoice. Finally, your finish choice moves the number. Smooth finishes take more skill and more passes than heavier stucco textures, so they usually cost more per square foot.
Why Quotes Vary So Widely
Two quotes for the same house can differ by thousands of dollars, and that gap usually traces back to scope, not greed. One contractor may include full lath replacement, proper flashing, and a three coat system. Another may quote a one coat system over the existing surface with minimal prep. As a result, comparing bottom-line numbers without comparing scope tells you nothing. Ask each bidder to specify the system type, number of coats, prep work included, and cure schedule. If a line item confuses you, look it up before you sign, not after.
Repairs follow the same logic on a smaller scale. For reference, Fixr.com puts the national average cost to repair stucco between $900 and $3,000, averaging around $1,700 for a buckled three coat section in a 10×10-foot area. Smaller damage costs far less, which is why the guide on stucco hole repair pricing by size and depth sorts costs by how big and how deep the damage runs. With this in mind, fixing existing damage before a larger install or resurfacing project almost always saves money compared to letting it spread.
How Stucco Textures and Finishes Shape Your Home's Appearance
The finish coat is the only layer you will ever see, so it deserves as much attention as the structure underneath. Stucco textures range from smooth santa-barbara style finishes to sand, dash, lace, and skip trowel patterns. Each one changes how your home reads from the street, and each one behaves differently over time. For example, smooth finishes show every imperfection in the brown coat beneath them, which is why they demand the most skilled application. Heavier textures hide minor flaws better, but they also collect more dust and can complicate future repairs.
Texture choice also affects long-term maintenance. When a wall eventually needs a patch, the repair crew has to match both the color and the texture, or the fix stands out like a scar. This is exactly the problem covered in the article on blending a rapid set stucco patch over an old repair. Choosing a common, well-documented texture at install time makes every future repair easier and cheaper. In practice, that is one of the most overlooked decisions in the whole project.
Matching New Stucco to Existing Walls
Additions raise a specific challenge: the new stucco has to blend with walls that have baked in the Scottsdale sun for years. Sun exposure fades pigment, and older application techniques may not match modern ones. Consequently, a good installer will create sample panels on site, let them cure, and compare them against your existing walls in daylight before committing to the full job. If your existing walls have cracks or previous patches, address those first. The comparison in stucco repair versus painting explains why fixing cracks before any refresh matters, and the same principle applies before tying an addition into old walls.
One more planning note: if you are repairing damage ahead of a larger project, timing matters. Small cracks close up in a day, while larger structural repairs take longer, and the stucco crack repair timeline guide maps out what to expect by damage size. Sequencing repairs before installation keeps your project on one schedule instead of two.
How to Choose a Contractor Who Actually Finishes the Job
The biggest fear for most homeowners is not the price. It is paying a deposit and watching the contractor disappear, or discovering halfway through that the quote missed half the scope. Fortunately, a few checks filter out most of the risk before any money changes hands.
Start with licensing and local track record. Arizona requires contractors to hold a license through the state Registrar of Contractors, and you can verify any license number online in minutes. Beyond paperwork, ask to see completed stucco work in Scottsdale specifically. Our climate punishes shortcuts, so a contractor with local jobs that have survived several monsoon seasons has proven more than any review page can. The Scottsdale stucco installation service page lays out exactly what a complete install should include, which gives you a checklist to compare against any bid.
Next, demand specificity in writing. A trustworthy quote names the system type, the number of coats, the lath and barrier materials, the finish texture, and the payment schedule tied to completed milestones. Vague quotes produce vague results. Additionally, ask how the contractor handles cure times and weather delays. Anyone who waves off those questions plans to rush the work.
Red Flags Worth Walking Away From
Watch for large upfront deposits, pressure to sign the same day, and prices dramatically below every other bid. A lowball number usually means missing scope, and the difference reappears later as a change order. Similarly, be cautious with national platforms that treat stucco as one checkbox among dozens of services. Stucco is a trade, not a line item, and the details that separate a twenty year wall from a five year wall live in the hands doing the work. A local specialist who talks fluently about scratch coats, cure schedules, and stucco textures is telling you something a generalist cannot fake.
Ready to Get Started?
If you are planning new stucco for a build, an addition, or walls that finally need their first real finish, start with a straightforward local conversation. We install complete stucco systems for Scottsdale homeowners, explain every line of the quote in plain English, and stay reachable from first walkthrough to final coat. Reach out, and get a clear answer on process, timeline, and cost before you commit to anything.